AI Support
Alarm
Camera & SIM
What does the "Camera connection lost" alarm mean?
What does the alarm "payment for subscription failed" mean?
What does the alarm "Subscription total usage or expired" mean?
What does the alarm "Payment for subscription failed due to authorization error" mean?
What does the "Wrong FTP Password" alarm mean?
What does the "Camera SMTP login failure" alarm mean?
What does the "Camera multiple photo channels" alarm mean?
What does the "Camera battery critical" alarm mean on Cloud Camera?
What does the "NG-SIM terminated, subscription migrated to gallery" alarm mean?
What does the "Subscription usage threshold reached" alarm mean?
What does the alarm "NG-SIM will be terminated in 14 days and subscription migrated to gallery" mean?
What does the "Battery low" alarm mean?
What does the "Payment for subscription failed due to bank declined" alarm mean?
What does the alarm "Camera storage almost full" mean?
What does the alarm "Payment for subscription failed due to insufficient funds" mean?
What does the alarm "Payment for subscription failed due to expired or missing payment method" mean?
What does the alarm "Camera storage full" mean?
FeedCon
What does next sync mean?
What does the "Subscription about to expire" alarm mean?
What does the "Subscription expired" alarm mean?
What does the alarm "Motor Not Connected" mean on my FeedCon?
What does the "Battery low" alarm mean?
What does the "Calibration failed" alarm mean?
What does the alarm "Lamp Broken" mean?
What does the alarm "FeedCon inactive" mean?
What does the "Battery critical" alarm mean?
What does the "The motor is jammed" alarm mean?
What does the "High temrature" alarm mean?
What does the "FeedCon restarted" alarm mean?
What does the "Connection lost" alarm mean?
What does the alarm "Motor running light" mean?
What does the alarm "Low food" mean?
App
Error message
Multi-user
Can a user have access to more than one role in Multi-user mode?
Can I change the role for a user once they have been assigned a role in Multi-user mode?
What should I do if I encounter issues setting up or using Multi-user mode?
How can I remove a user from Multi-user mode?
What is the maximum number of users that can be in Multi-user mode?
How can I invite others to join as users in Multi-user mode?
How can I use Multi-user mode on my account?
What are the different roles in Multi-user mode and what can each role do?
What is Multi-user mode and how does it work?
Private mode
How do I activate Private Mode on a device?
Can other users see the device when it's in Private Mode?
What is Private Mode and how does it work?
How do I cancel subscription for my device?
Why am I not receiving notifications from the Nordic Gamekeeper app on my Android device?
How do I update profile information in the app?
How do I register a Nordic Gamekeeper account?
How do I reset my password?
Cameras & SIM
How do I update my Cloud Camera® firmware?
How do I deactivate the AI feature on my Cloud Camera?
What should I do if my Cloud Camera does not follow my settings or commands via the app?
What is the subscription price for the Cloud Camera®?
Where do I find the settings for NG-SIM®?
Can I send pictures from the camera to more than one email address with NG-SIM®?
Which mobile network is needed for NG-SIM®?
What does activity time mean in the Cloud Camera® settings?
Where can I see the images sent from Cloud Camera®?
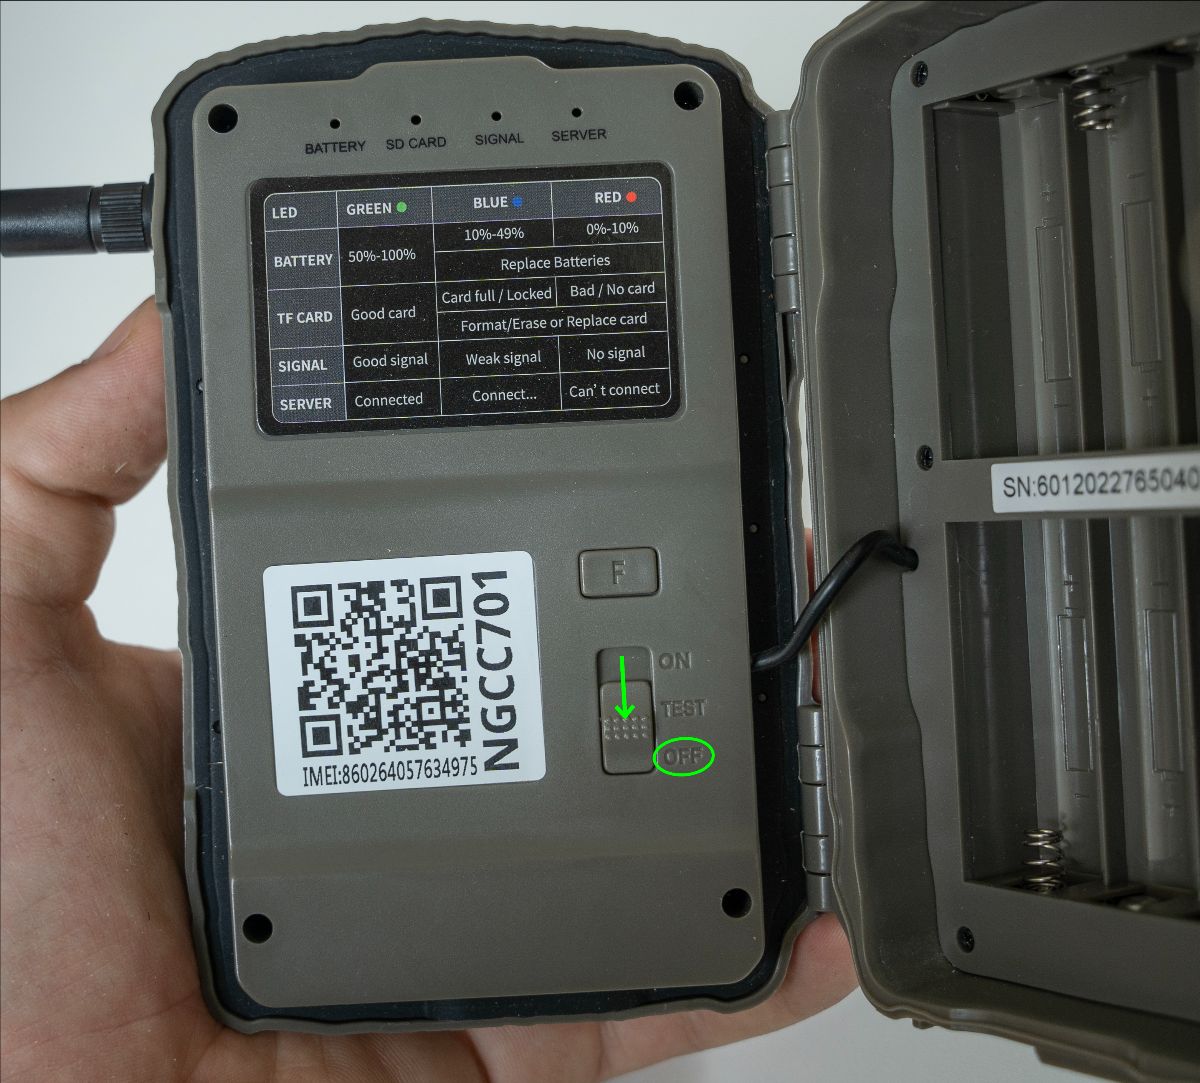
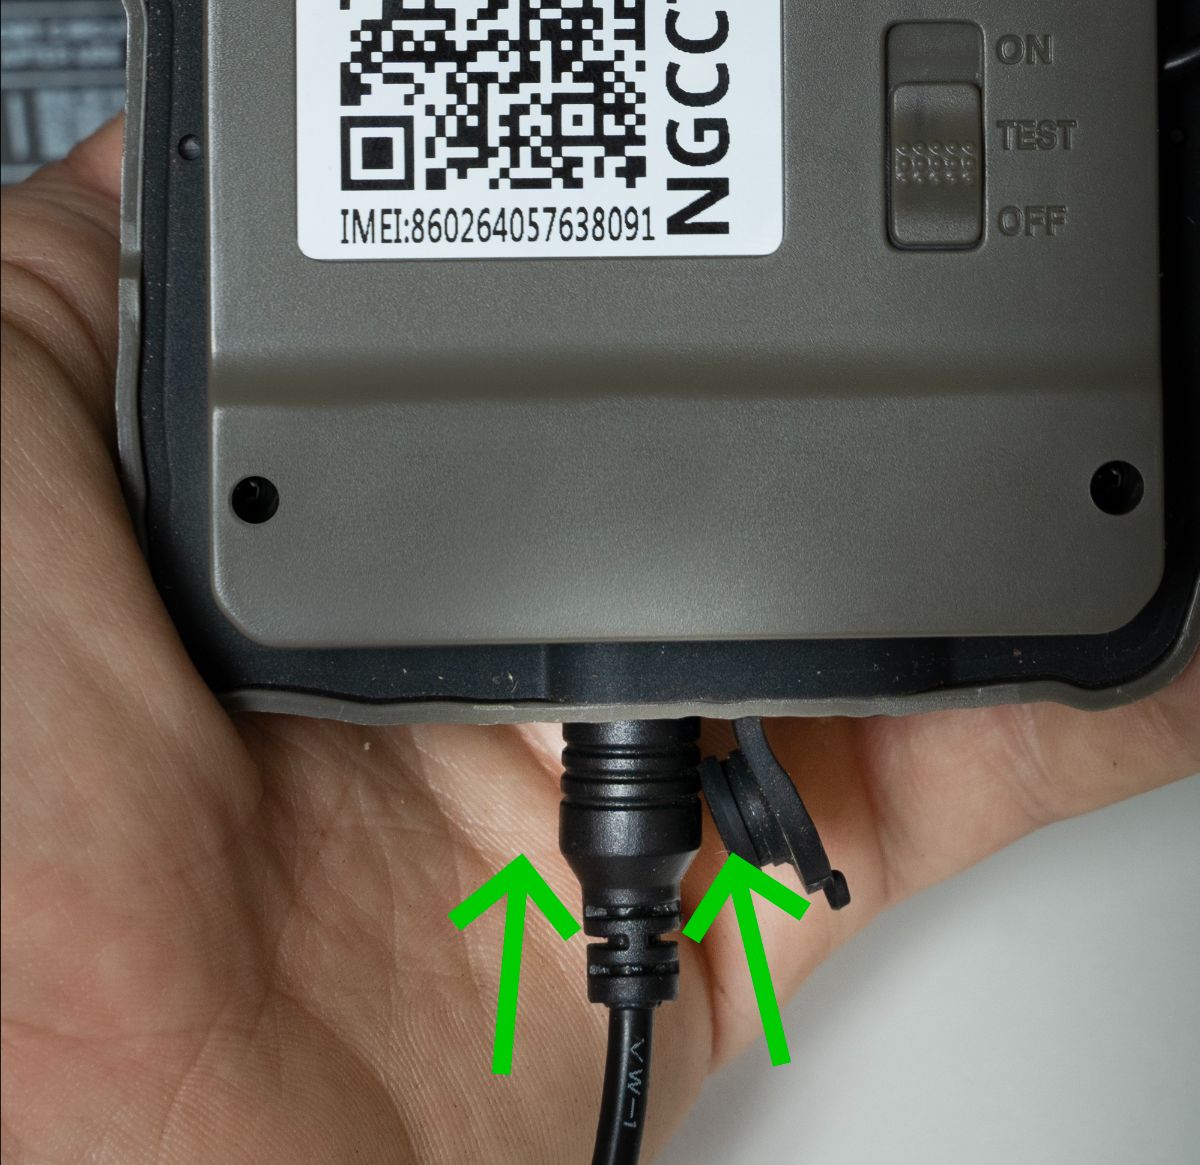
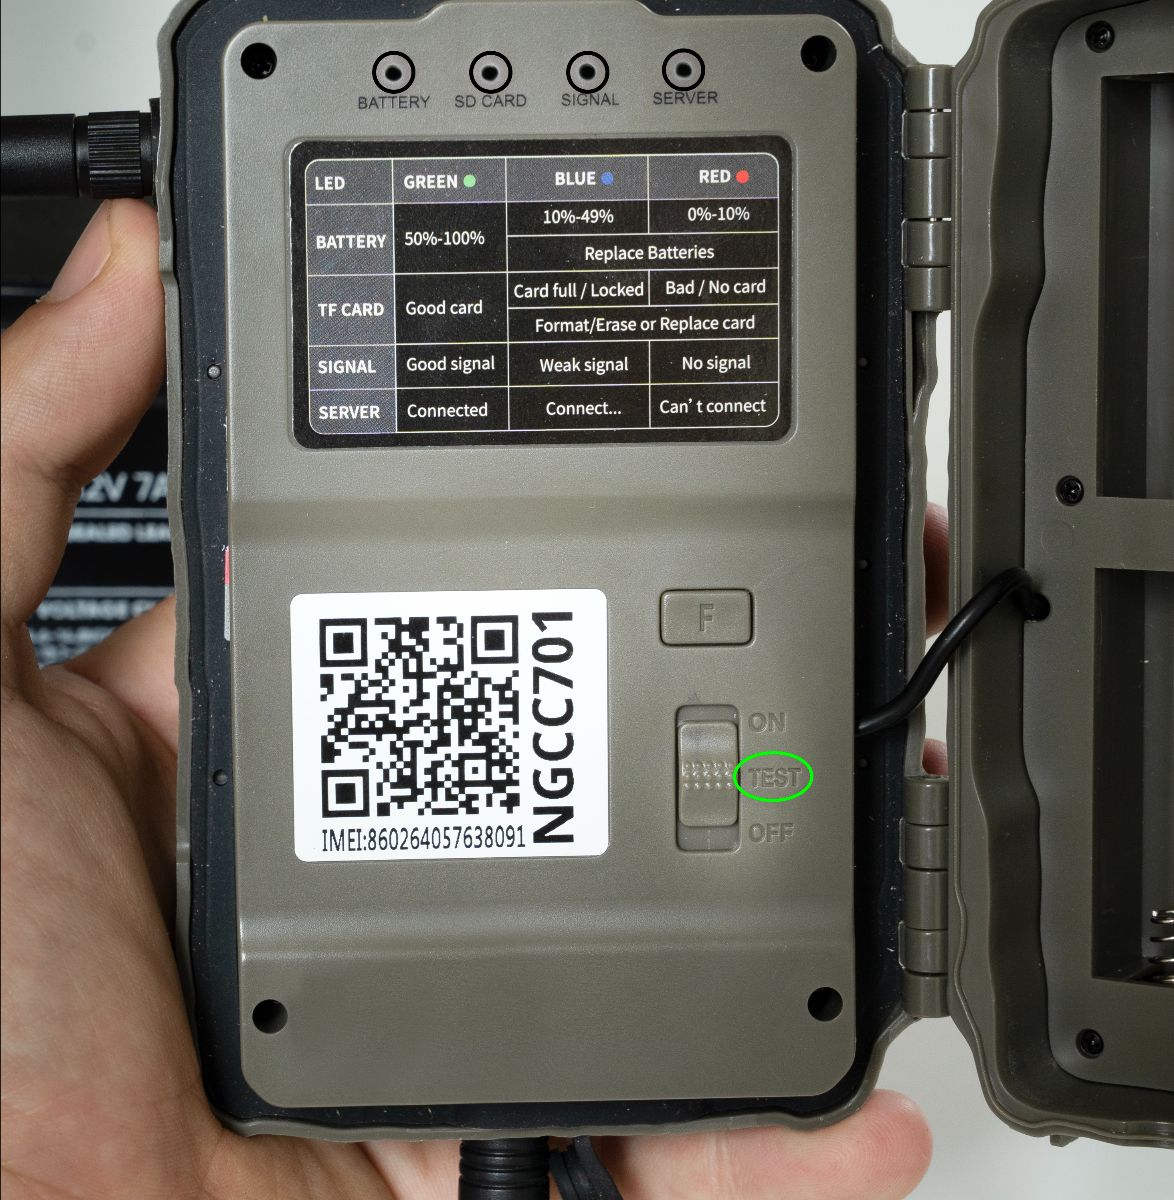
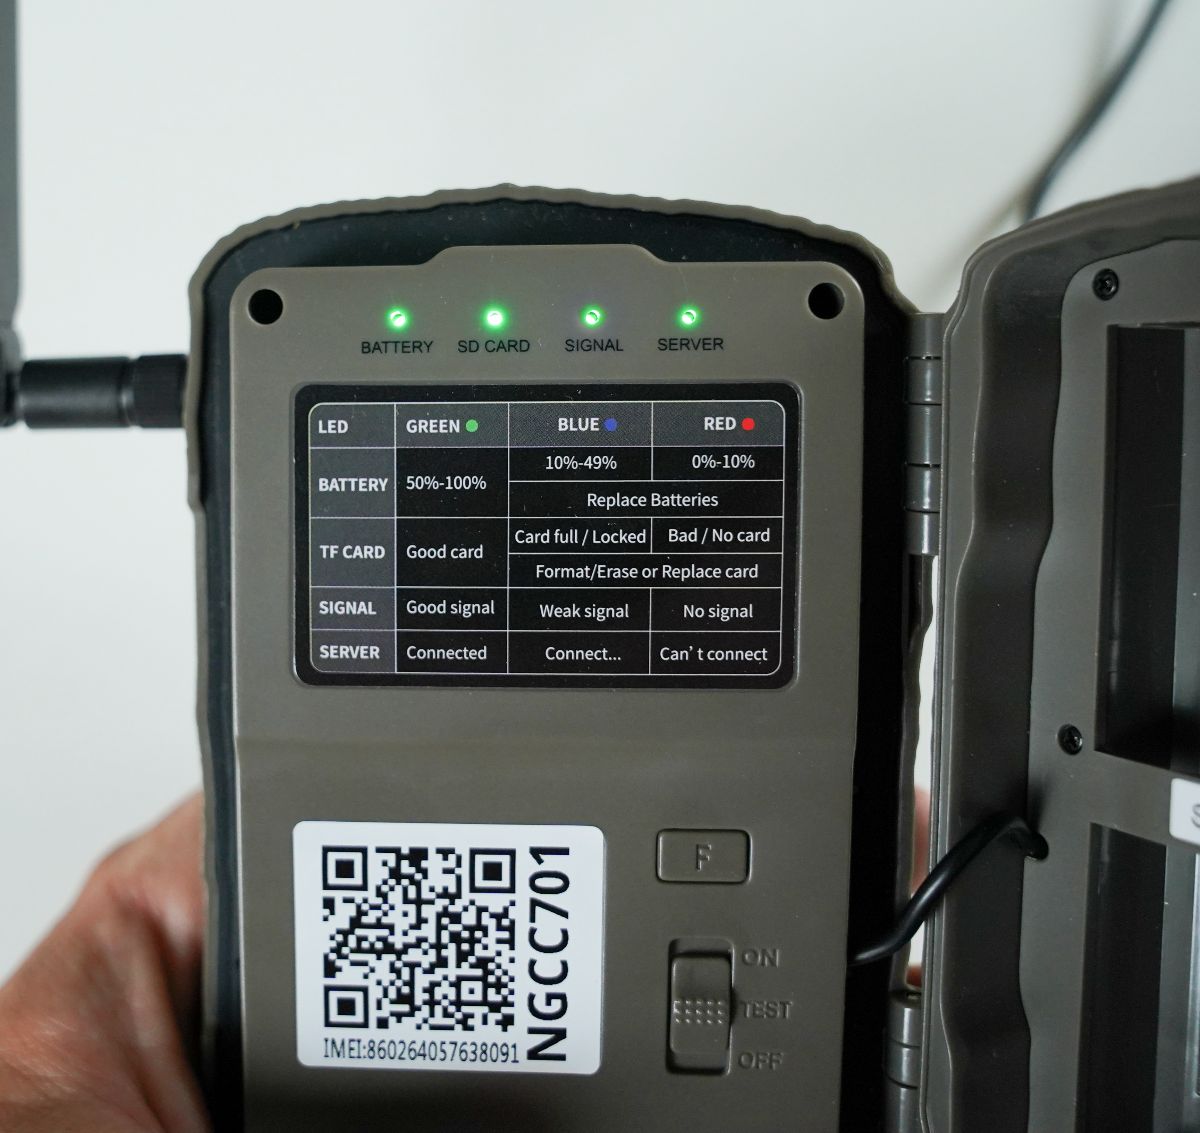
What do the LED's on the Cloud Camera® indicate?
Should I use SMTP or FTP with NG-SIM®?
Can the subscription level be changed on NG-SIM®?
My camera does not send pictures with NG-SIM®, what could be the reason?
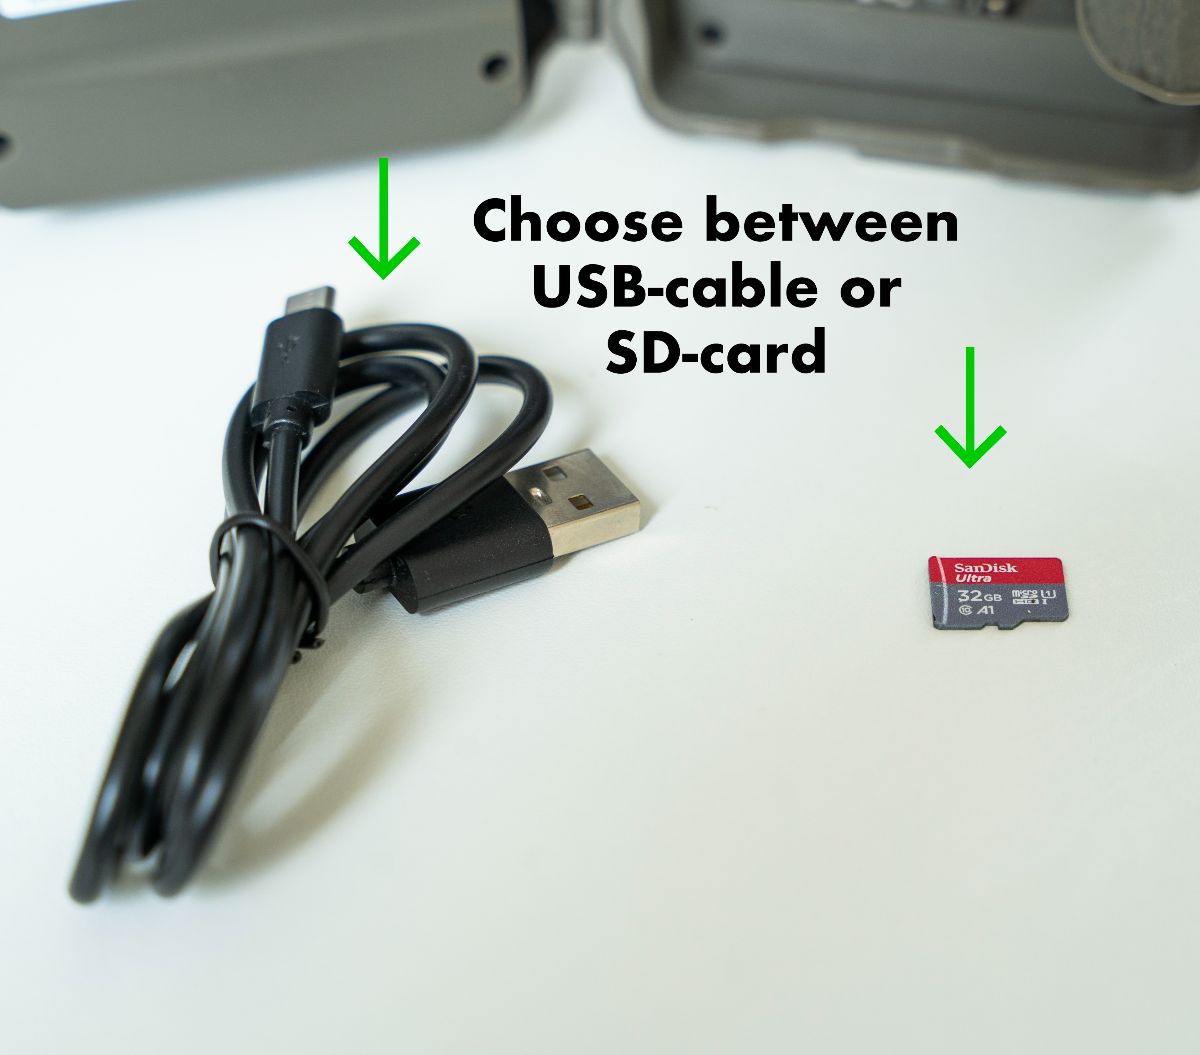
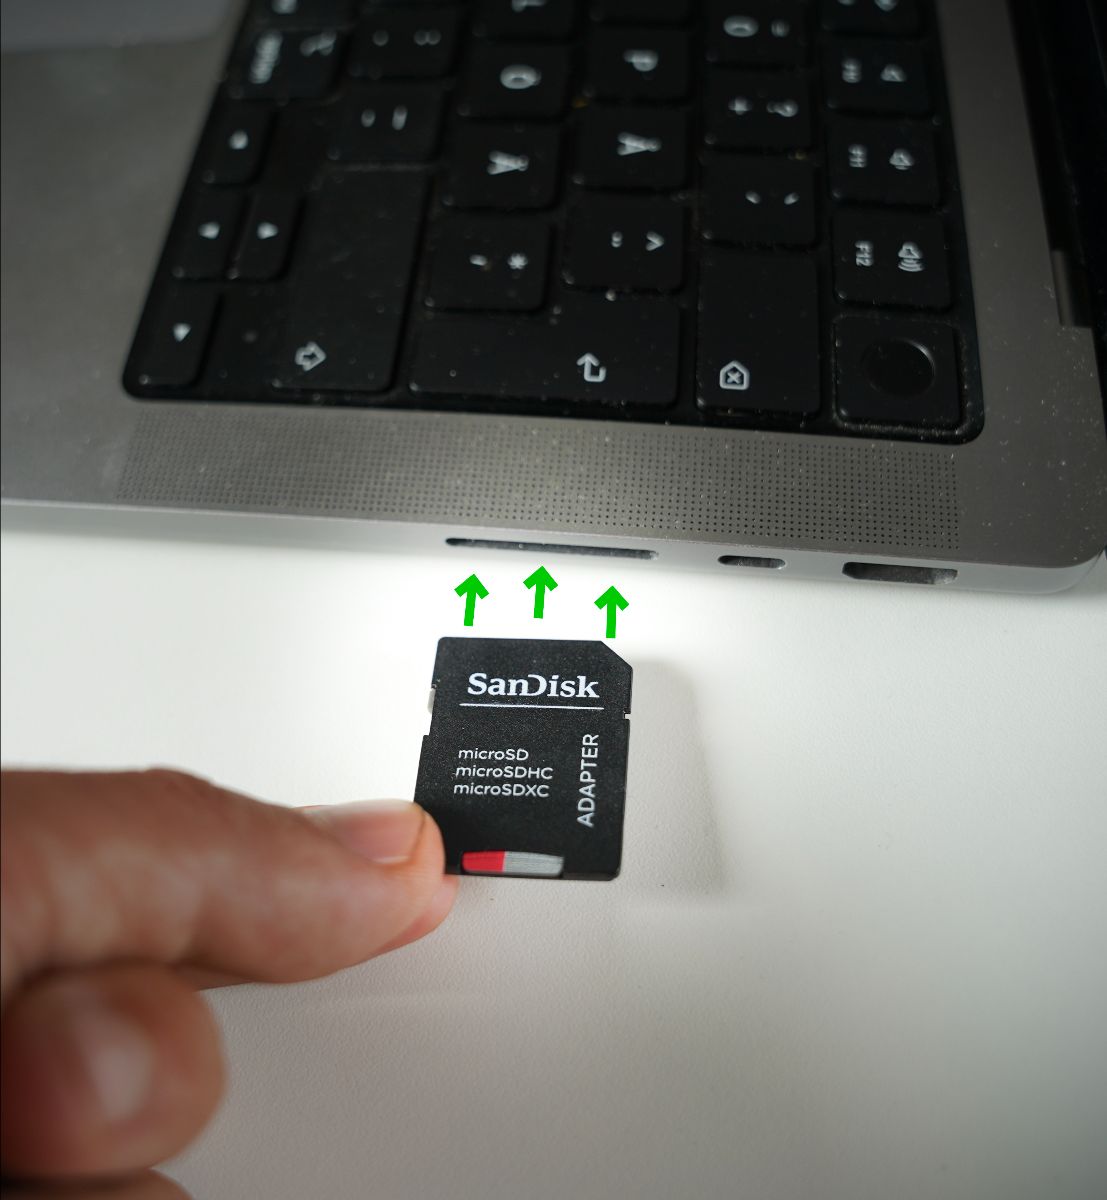
Which SD-Cards works with the Cloud Camera®?
My NG-SIM® data/MB is running out quickly. What should I do?
How many MB are included in the subscription for NG-SIM®?
Is it possible to send SMS with NG-SIM®?
What happens if the battery drops too low on the Cloud Camera®?
When does Cloud Camera® download the settings?
Where do I change the settings on the Cloud Camera®?
What is the difference between the levels of the Cloud Camera® subscription?
How can I view my data usage on my subscription?
How many MB are included in the Cloud Camera® subscription?
What is adaptive configuration on Cloud Camera®?
How should I position the Cloud Camera®?
What does capture mode mean in Cloud Camera® settings?
What does “photo resolution” mean in settings with Cloud Camera®?
What does upload interval mean in the Cloud Camera® settings?
What does upload resolution mean in the Cloud Camera® settings?
Why am I not able to place the pin for my unit on the map during the installation process?
What does “sequence” mean in the Cloud Camera® settings?
I'm recieving too many pictures, how do i fix that?
Where do I find the APN settings for NG-SIM®?
Where do I find the SMTP settings for NG-SIM®?
Where do I find the FTP settings for NG-SIM®?
What do I need to do to get my NG-SIM® up and running with the Nordic Gamekeeper app?
Is it possible to request the Cloud Camera® to capture a photo on-demand?
Why does my camera send duplicates of pictures with NG-SIM®?
Why can’t I dismiss the alarm on my unit in the NG app?
What do I need to do to get NG-SIM® up and running with the Nordic Gamekeeper App?
Where do I see my data consumption of my NG-SIM® subscription?
Does the image resolution affect the consumption of data/MB?
Can I move NG-SIM® between different cameras/brands?
Does NG-SIM® work with all cameras?
How many NG-SIM® can I connect to my account in the Nordic Gamekeeper app?
Why can't I change the settings on my Cloud Camera®?
What does “time lapse” delay mean in settings with Cloud Camera®?
What does "shutter speed" mean in the Cloud Camera® settings?
What happens if payment fails or isn’t paid with NG-SIM®?
How many NG-SIM®s can I connect to my account in the app?
Why do I not get network coverage with NG-SIM®?
What does PIR sensitivity mean in the Cloud Camera® settings?
How does the payment of an NG-SIM® subscription work?
How do I format my Cloud Camera?
How do I update my payment method for my subscription?
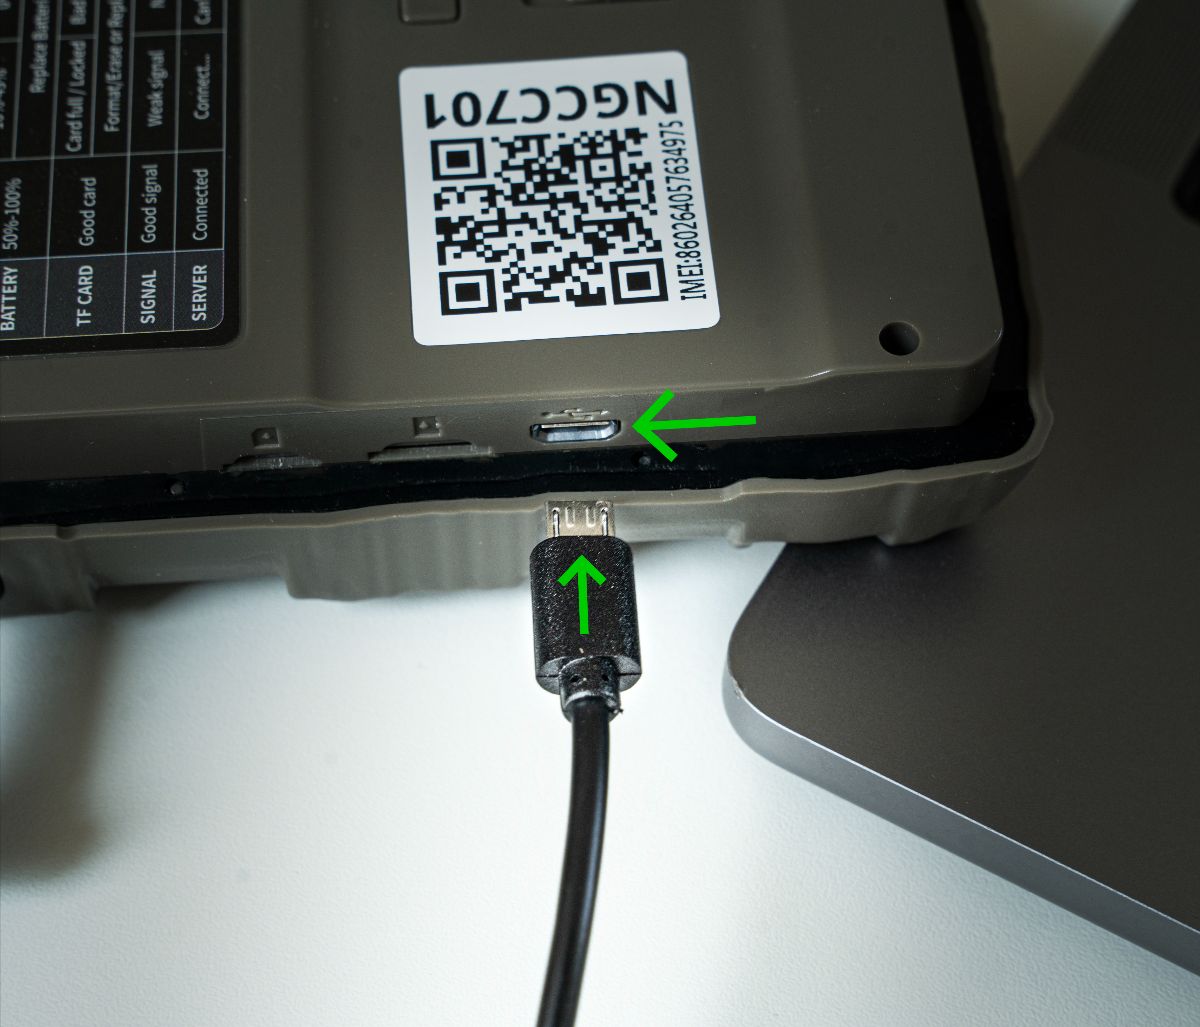
How do I get started with my Cloud Camera®?
Which settings should I fill into my third-party camera when using NG-SIM?
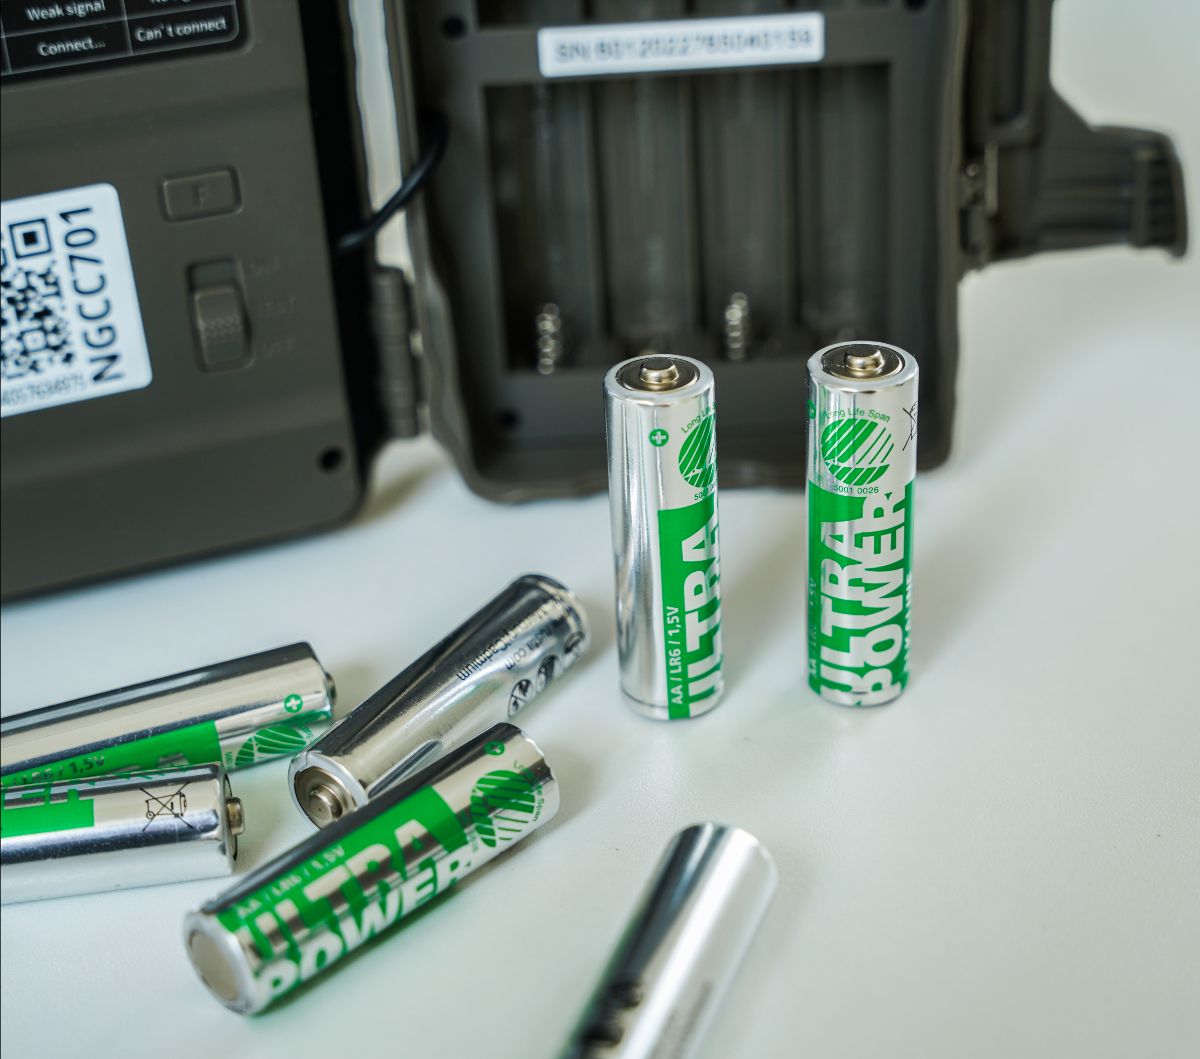
Which batteries can be used with the Cloud Camera®?
What is included when buying an NG-SIM®?
What does PIR delay mean in Cloud Camera® settings ?
Is there a limit to how many images I can analyze with the AI feature?
Does the AI image recognition feature use more data?
Are there any recommendations for optimal performance of the AI image recognition feature?
How do I activate AI image recognition on my images?
What resolution is required to use the AI image recognition feature?
How accurate is the AI image recognition?
Do I need an internet connection to use the AI feature?
What is the advantage of the AI image recognition feature?
Why do I see rectangles in my images?
Can I use the AI feature with a third-party camera?
Why are no images appearing in my gallery after I activated the AI feature?
How does the filtering work in the app?
Can I save specific images as favorites?
Is there a limit to how many objects can be identified in an image?
Does the AI feature work both day and night?
How does AI filtering work when it is active?
How do I filter images in the gallery to show only animals, people, or vehicles?
What does SD-card cycle mean in the Cloud Camera® settings?
What is the new AI image recognition feature in the Nordic Gamekeeper app?
Feeders & FeedCon
What are the available time modes in FeedCon?
What network is needed to use FeedCon®?
Can I change the subscription level on FeedCon®?
Why doesn't Bluetooth work with the remote control on FeedCon®?
Which battery is compatible with Nordic Gamekeeper feeders?
How do I change the schedule time on my feeder?
How can I enable Astro mode on my feeding schedule for my feeder?
How do I connect NG-SIM® to my already installed FeedCon®?
How to calibrate FeedCon®?
How do I connect Nordic Gamekeeper Cloud Camera to my already installed FeedCon®?
How does the communication between FeedCon® and the Nordic Gamekeeper app work?
If I want to test my FeedCon® out in the field, how do I do it?
Why can't I choose Astro mode with FeedCon®?
Is FeedCon® compatible with all feeders on the market?
How much power can the FeedCon® handle from a solar panel?
Can I move FeedCon® between different feeders/brands?
What do I need to do to get my FeedCon® started?
What kind of battery can I use to connect to FeedCon®?
How much power does FeedCon® consume?
How weatherproof is FeedCon®?
Is FeedCon® theft-proof?
Do I need to buy a SIM card to use FeedCon®?
How many kg does the feeders hold?
How many days does the feed last in the feeders?
What is the total height of the feeders?
How do I activate food save mode on my feeder with activity sensor?
How do I add a schedule time on my feeder with FeedCon®?
How do I activate food save mode on my feeder/FeedCon with an activity sensor?
What is the Nordic Gamekeeper gallery?
How do I connect a trail camera to my already installed FeedCon®?
What happens if my subscription expires?
How many FeedCon® devices can I connect to my account in the NG app?
What happens if I plug in the wrong cord in the wrong pins in FeedCon®?
Manuals
- All Categories
- Cameras & SIM
- How do I update my Cloud Camera® firmware?
How do I update my Cloud Camera® firmware?